
Cisco Switches Basic Initial Configuration
Learning how to bring a Cisco switch to life with its first configuration.
First Listen: let your ears lead the way before your mind takes notes.
📻 FZ2CCNA Radio:
Then read: let your eyes explore before your mind starts to explain.
Getting started: the essential setup for Cisco switches.
Learning Objectives
By the end of this lesson, you will be able to:
- Recall key commands required for the CCNA exam.
- Explain why initial switch configuration is necessary.
- Access a Cisco switch through the console.
- Configure hostname, passwords, and management IP.
- Save configurations and secure unused ports.
What is a Cisco Switch
Introduction
Think of a Cisco switch like a brand-new smartphone. Straight out of the box, it has all the hardware and potential inside, but on its own it doesn’t do much. Before you can call, text, or install apps, you need to walk through a few important steps: give it a name, set a password, and connect it to a network.
Cisco switches work in exactly the same way. When you first power on a switch, it is essentially a blank slate. It has no identity, no protection, and no instructions on how to interact with other devices. To unlock its potential, you must perform a basic initial configuration. This includes giving the switch a hostname so it can be recognized on the network, setting up secure passwords to protect against unauthorized access, and saving your work so the settings remain after a restart.
Just like setting up your phone ensures it is personal, safe, and ready for daily use, the initial configuration of a Cisco switch is your first step toward making the device functional, secure, and reliable within a network. Without these steps, the switch is simply powered on but not truly “alive” in your network.
Reminder: Cisco Switch Basics
- What is a Cisco Switch?
Think of it as a traffic director inside your Local Area Network (LAN). It decides where each frame should go so that data reaches the right device quickly and efficiently. - Layer of Operation
A switch works mainly at Layer 2 of the OSI model (Data Link layer). This means it forwards data based on MAC addresses. Some models also support limited Layer 3 functions, but its core job is Layer 2 switching. - Without Configuration
A new switch out of the box is insecure and anonymous. All ports are open, there’s no password, and anyone could plug in. It does not identify itself in the network beyond its factory defaults. - With Configuration
Once you configure it, the switch becomes identifiable, secure, and manageable. You can set a hostname, protect access with passwords, enable secure remote management, and control how traffic flows through VLANs and policies.
Why Do We Need Basic Configuration?
- Identity → Hostname
A switch without a name is hard to identify in a network with multiple devices. Giving it a hostname makes it easier to recognize in logs, troubleshooting, and documentation. - Security → Passwords
Leaving default access is dangerous. Setting console, vty, and enable passwords ensures that only authorized people can log in and make changes. - Management → IP Address
If you want to manage the switch remotely (for example, through SSH orTelnet), it needs an IP address on its management VLAN. Without it, you’d be stuck configuring only through the console cable. - Best Practice → Disable Unused Ports
Open, unused ports are an easy entry point for attackers or accidental connections. Shutting them down reduces risk and keeps the network cleaner.
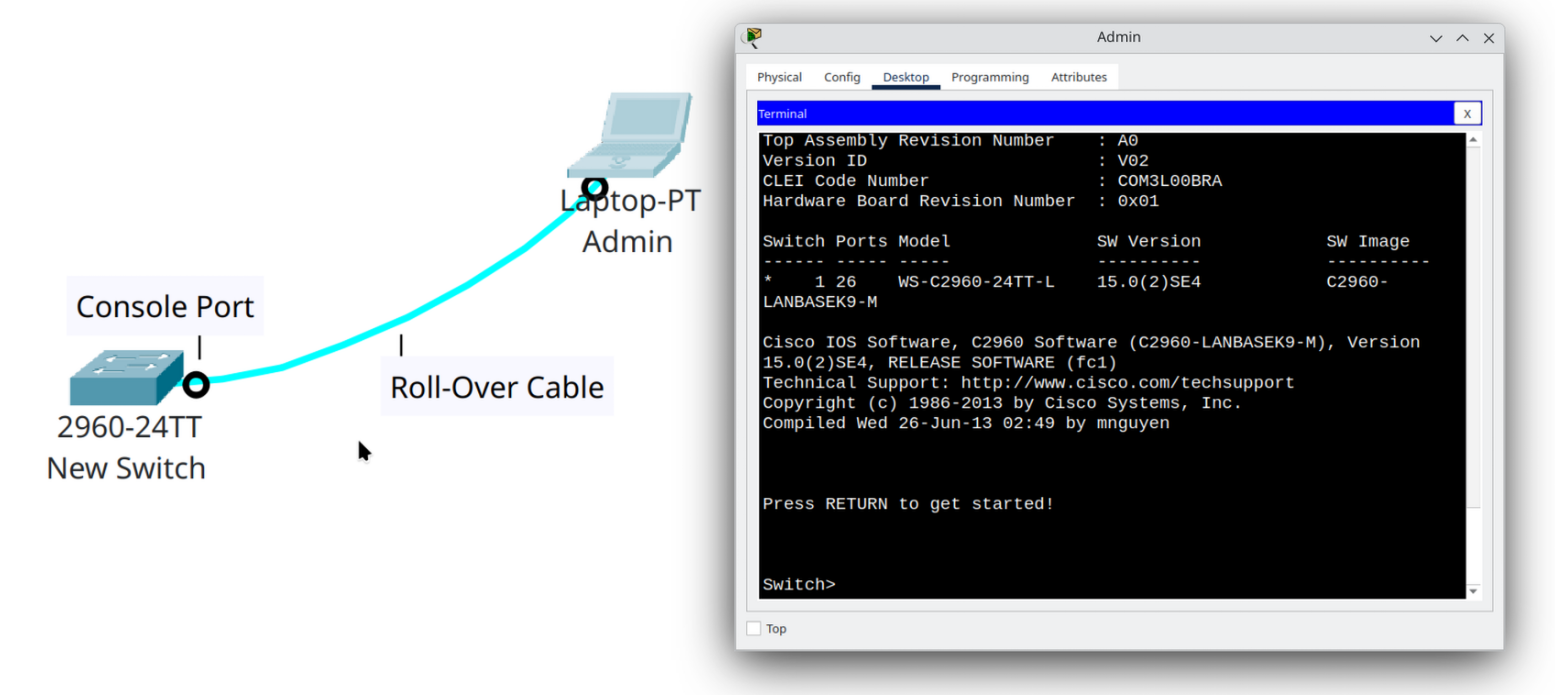
Launch Packet Tracer and actively practice each step to build your skills.Step 1 | Accessing the Switch
Before you can configure a Cisco switch, you need to establish a local connection to its console port. This is done through a console cable—either the classic RJ-45 to serial cable or, on modern laptops without serial ports, a USB-to-serial adapter.
To interact with the switch, you also need a terminal emulator program. Common choices include PuTTY, Tera Term, or SecureCRT. These programs allow your computer to send and receive text commands over the console connection.
When opening the terminal session, you must set the connection parameters to the Cisco defaults:
- Baud rate (speed): 9600 bits per second
- Data bits: 8
- Parity: None
- Stop bits: 1
This is usually written as 9600 / 8 / N / 1.
Once the connection is established and the switch is powered on, you will see the following prompt on your screen:
Switch>This indicates that you are in user EXEC mode, the most basic access level on a Cisco device. In this mode, you can run simple commands like ping or show version, but you cannot make configuration changes. To configure the switch, you must later enter privileged EXEC mode (Switch#) and then global configuration mode.
Step 2 | Assigning a Hostname
After entering privileged EXEC mode and then global configuration mode, one of the very first tasks is to give your switch a hostname. By default, every Cisco switch starts with the generic name Switch. If you leave it like this, and you later manage several switches, it can quickly become confusing because they will all look the same in the command-line prompt.
Assigning a hostname makes it easy to identify the device you are configuring, both locally and when connecting remotely (for example, through Telnet or SSH). It’s a simple step, but it sets the foundation for organized network management.
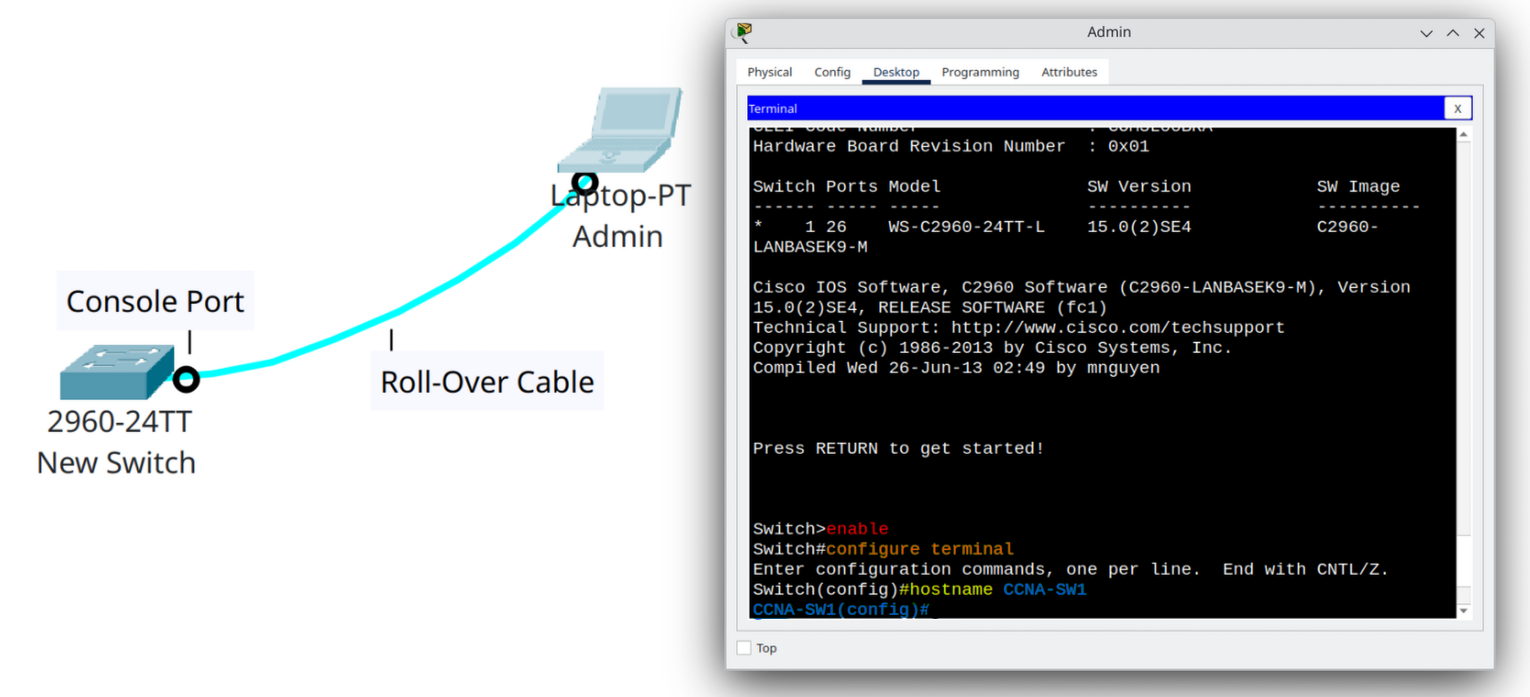
Here is the process:
Switch> enable
Switch# configure terminal
Switch(config)# hostname CCNA-SW1
CCNA-SW1(config)#enablemoves you into privileged EXEC mode.configure terminaltakes you into global configuration mode, where you can make permanent changes to the device.hostname CCNA-SW1renames the switch from its default “Switch” to CCNA-SW1.
Notice the prompt change at the end:
Instead of showing Switch(config)#, the CLI now displays CCNA-SW1(config)#. This is your confirmation that the new hostname has taken effect.
From now on, whenever you see the prompt, you’ll know you are working on CCNA-SW1, not some other switch.
Standard Procedures for Naming a Cisco Switch
- Enter Configuration Mode
To set the name, go into global configuration:Switch> enableSwitch# configure terminalSwitch(config)# hostname NAME[ReplaceNAMEwith your chosen hostname.]
- Follow Cisco’s Syntax Rules
- Maximum of 63 characters.
- Must begin with a letter.
- Can include letters, numbers, and hyphens (-).
- Cannot include spaces.
- Avoid special characters like
! @ # $ %.
- Use Consistent Naming Conventions (Best Practices)
A hostname should describe the device’s role and location:- Device type →
SWfor switch,Rfor router,FWfor firewall. - Location → building code, floor number, or room (e.g., HQ1, BLDG3).
- Function/role → distribution, access, core, etc.
- Numbering → if multiple devices of the same type exist.
- Device type →
- Examples of Good Hostnames
HQ1-SW1→ Switch 1 at Headquarters, building 1.DC1-CORE-SW2→ Core switch 2 at Data Center 1.NYC-ACCESS-SW3→ Access layer switch 3 in New York City.CCNA-SW1→ Lab switch for CCNA training.
- Examples of Bad Hostnames (confusing or invalid)
Switch→ too generic, default name.Main Switch→ contains a space, not allowed.$$CORE_SW1→ starts with symbols, not valid.Building3FirstFloorSwitch→ too long, not practical.
- Save the Configuration
Always save your changes so they persist after a reboot:CCNA-SW1# copy running-config startup-config
Step 3 | Securing Access with Passwords
Think of passwords as the locks on every possible “door” to your switch. Without them, anyone can walk in and take control. Cisco IOS allows you to place passwords on three critical access points: privileged EXEC mode, console access, and remote access (Telnet/SSH).
1. Privileged EXEC Mode – Enable Password
This password protects access to the most powerful mode on your switch, where configuration changes are made.
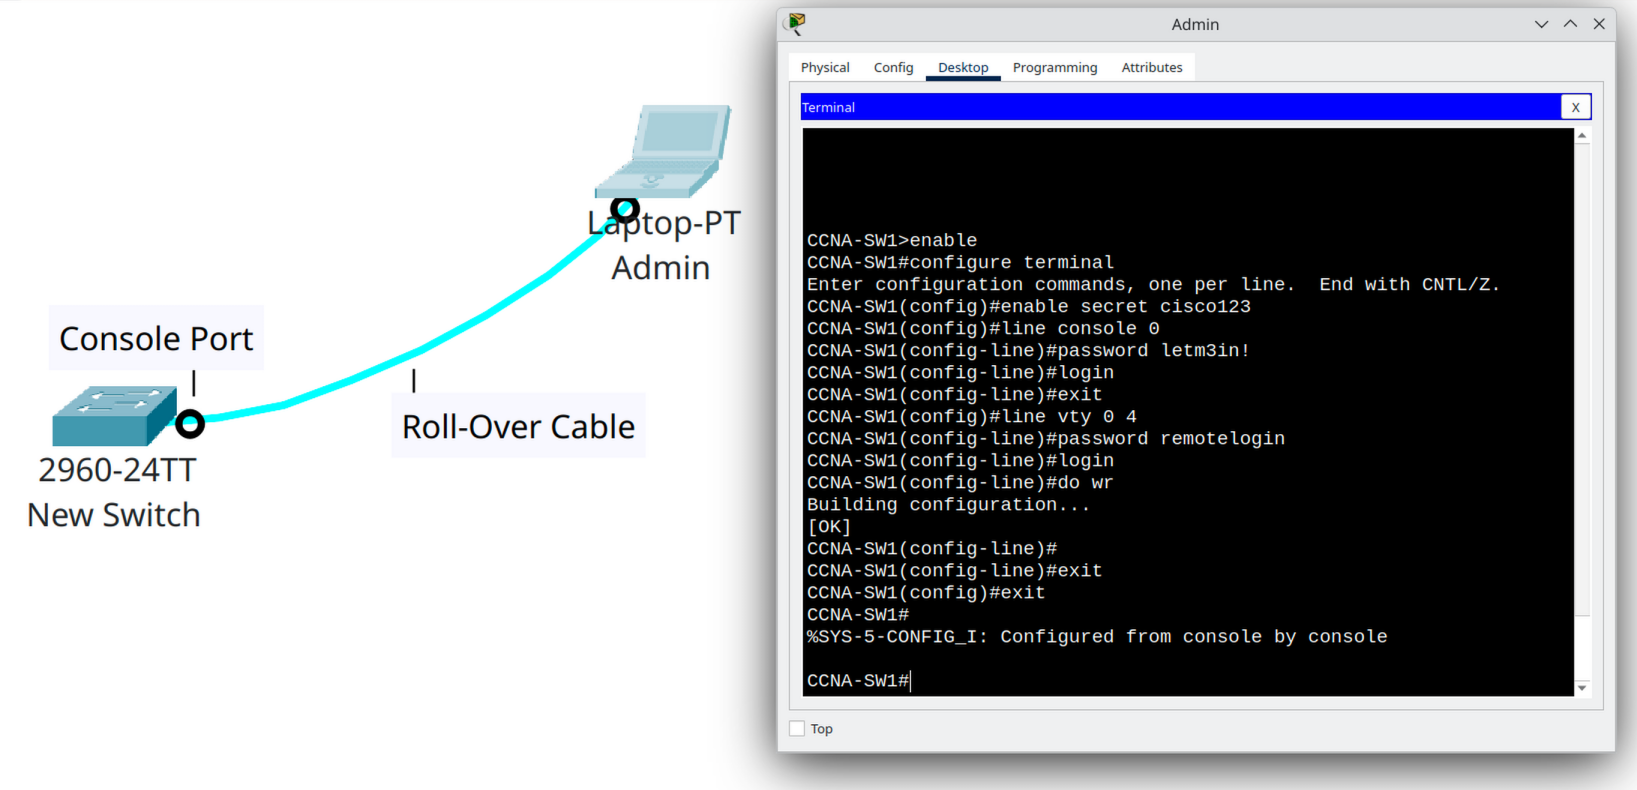
CCNA-SW1(config)# enable secret cisco123enable secretsets an encrypted password for privileged EXEC mode.- Unlike
enable password, theenable secretis stored in a more secure, encrypted form. - Think of this as the master key to the switch.
2. Console Password – Local Physical Access
The console port is used when you connect directly with a cable. Without protection, anyone with physical access could configure the switch.
CCNA-SW1(config)# line console 0
CCNA-SW1(config-line)# password letm3in!
CCNA-SW1(config-line)# login
line console 0selects the console line.password letmeinsets the password.logintells the switch to ask for the password when someone tries to enter.- This is like putting a lock on the front door of your network device.
3. VTY Password – Remote Access (Telnet/SSH)
The VTY lines control remote access. If you plan to use Telnet or SSH, you must secure them with a password.
CCNA-SW1(config)# line vty 0 4
CCNA-SW1(config-line)# password remotelogin
CCNA-SW1(config-line)# login
line vty 0 4selects VTY lines 0 through 4 (up to 5 simultaneous remote sessions).password remotelogindefines the password.loginenforces it, ensuring no one can connect without authentication.- This is like putting locks on the remote gates to your switch.
Important Note
If you set a password but forget the login command, the switch won’t actually enforce it. You put a lock (password) on the door, but without login, the switch won’t actually use it.
Step 4 | Saving the Configuration
Don’t lose your work after a reboot!
By default, Cisco switches keep your changes only in RAM (the running configuration). If the device restarts, all unsaved changes will disappear. To make your configuration permanent, you must copy it into NVRAM as the startup configuration.
CCNA-SW1# copy running-config startup-config- Running-config → The “live” configuration currently running in memory (RAM). Fast, but temporary.
- Startup-config → The saved configuration stored in NVRAM. This file is loaded every time the device boots up.
Tip
Always save your configuration after making important changes. Otherwise, a simple reboot or power outage will erase your work!
Step 5 | Assigning a Management IP
Attention!
We will study VLANs in detail later. For now, this step only introduces the basic idea of using VLAN 1 as a management interface.
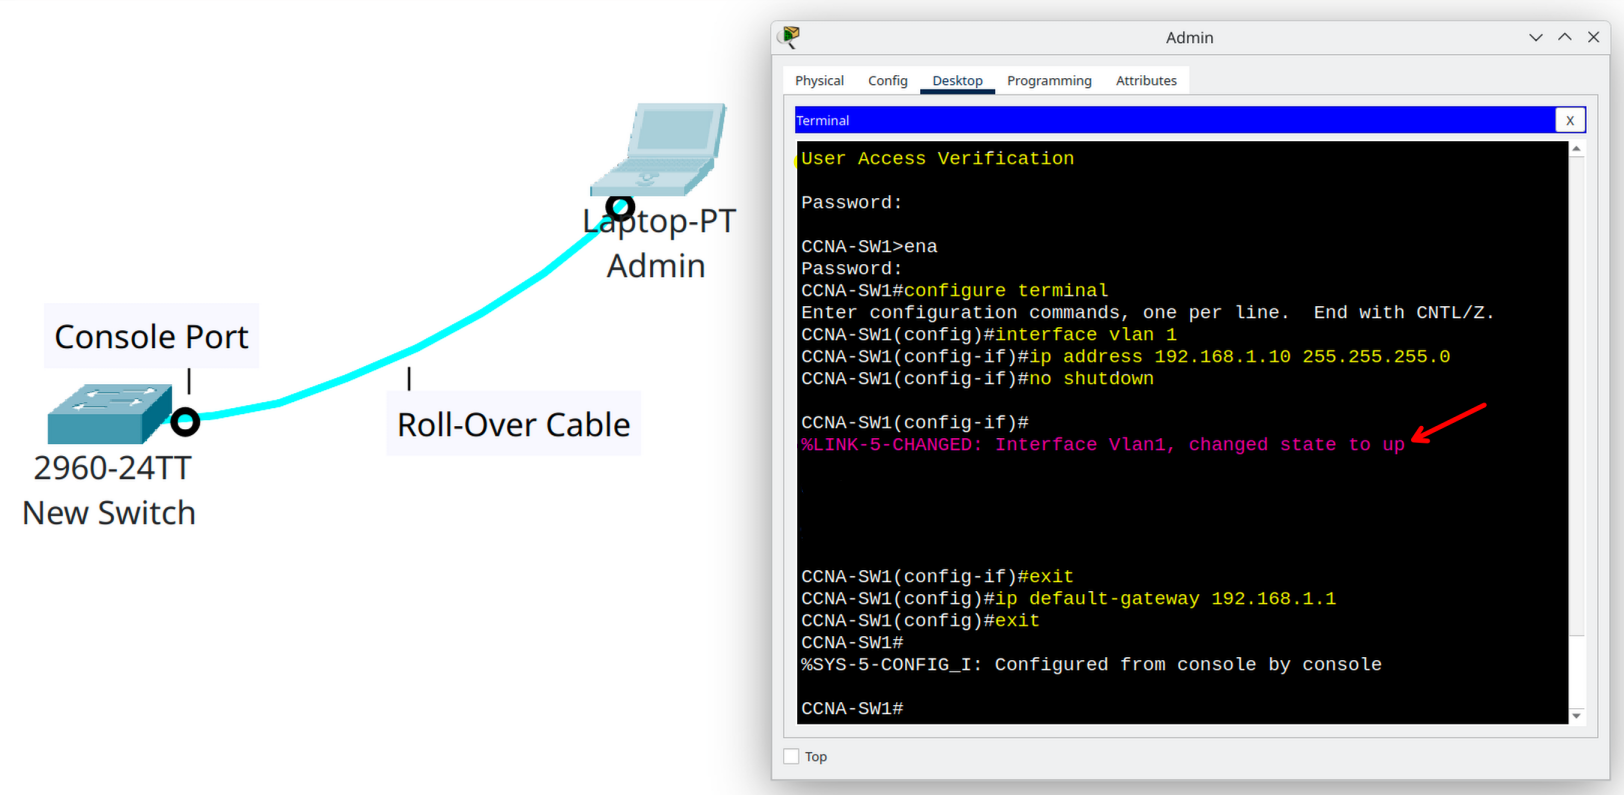
By default, switches forward traffic at Layer 2 and do not require an IP address. However, if you want to manage the switch remotely (for example, by using Telnet, SSH, or ping), you must assign an IP address to the switch’s management interface.
On Cisco switches, VLAN 1 is the default management VLAN. We can configure it with an IP address and a default gateway so that the switch can be reached from other networks.
CCNA-SW1(config)# interface vlan 1
CCNA-SW1(config-if)# ip address 192.168.1.10 255.255.255.0
CCNA-SW1(config-if)# no shutdown
CCNA-SW1(config)# ip default-gateway 192.168.1.1
Remember
At this stage, we are not learning VLANs in depth—only how to give the switch a “management identity” on the network. Later, we will revisit VLANs to understand segmentation, trunking, and security in detail.
Step 6 | Disabling Unused Ports
Think of each unused switch port as an open window in your house. Even if no one is using it right now, it could allow unwanted access later. The safest practice is to close (shut down) all unused ports until you actually need them. This improves both security and network stability.
How to disable a range of ports
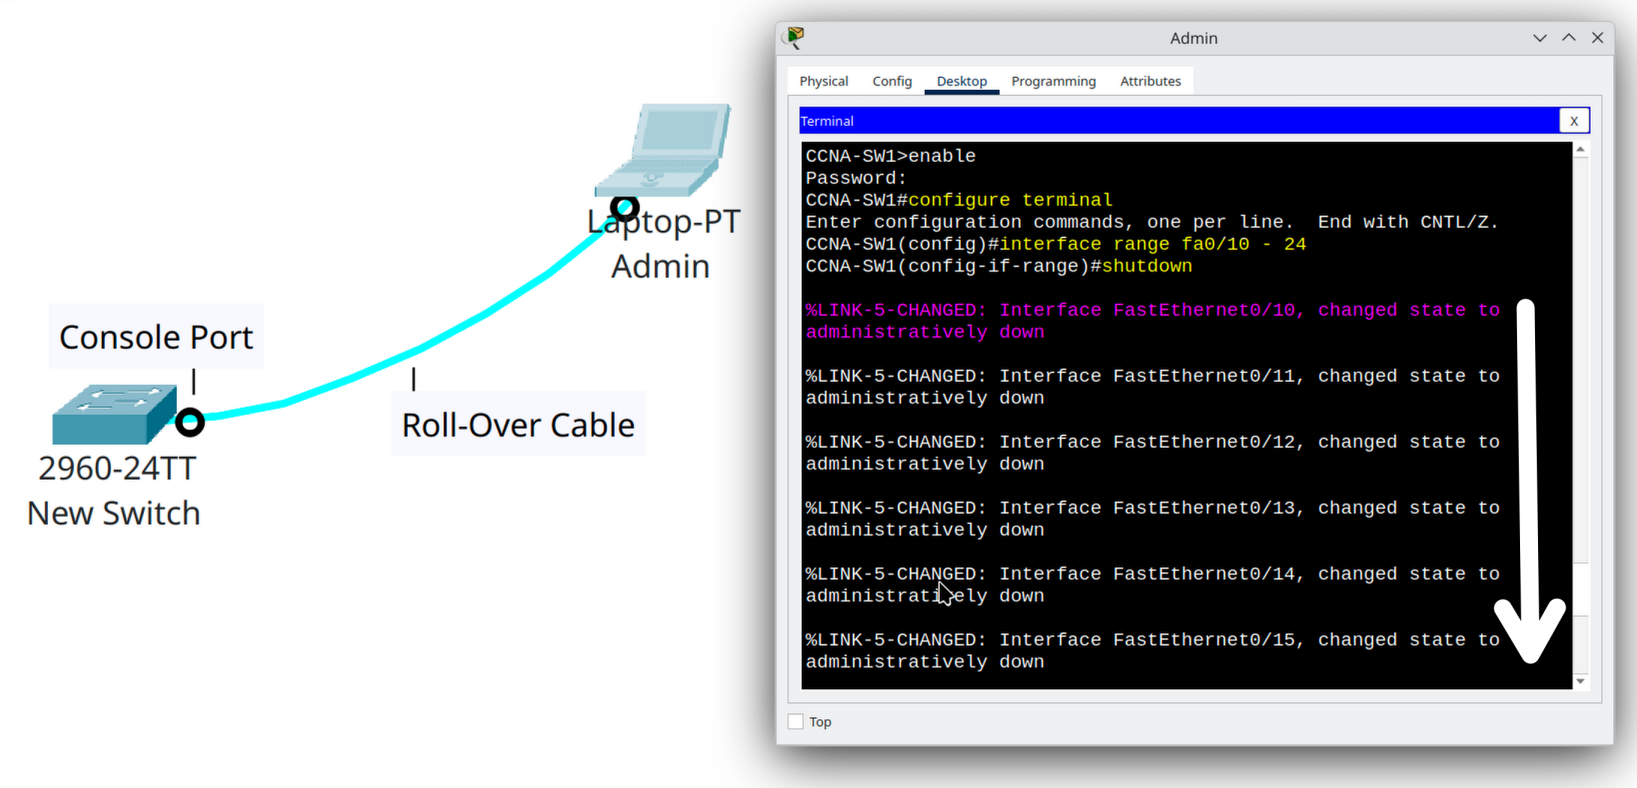
On switch SW1, let’s say the FastEthernet ports from 0/10 to 0/24 are not being used. You can disable them all at once with the following commands:
CCNA-SW1(config)# interface range fa0/10 - 24
CCNA-SW1(config-if-range)# shutdown
At this point, the ports are administratively down. If someone connects a device to them, it will not be able to communicate on the network.
The range command in Cisco IOS is used inside interface configuration mode to select multiple interfaces at the same time. This allows you to apply one set of commands to all of them at once, instead of repeating the configuration for each interface individually.

For example:
CCNA-SW1(config)# interface range fastEthernet 0/1 - 24
CCNA-SW1(config-if-range)# shutdown

This command shuts down interfaces FastEthernet 0/1 through FastEthernet 0/24 all at once. You can also combine non-sequential ports:

CCNA-SW1(config)# interface range gigabitEthernet 0/1 , gigabitEthernet 0/2 , fastEthernet 0/10 - 12

That command lets you configure multiple ports (even from different groups) together.
How to re-enable later
If you later decide to use one of those ports, simply go back into the interface configuration and reverse the command:
CCNA-SW1(config)# interface fa0/12
CCNA-SW1(config-if)# no shutdown
This brings the port back to an up/up state, ready to connect devices safely and intentionally.
Best Practice Reminder
Always disable ports you are not using.
Document which ports are shut down for future reference.
When re-enabling, verify withshow ip interface briefto confirm the port status.
CCNA Exam Tips
Enter global config:enableconfigure terminal
Hostname:hostname [CCNA-SW1]
Enable secret:enable secret [password]
Console password:line console 0password [password]login
Save configs:copy running-config startup-config
Management IP:interface vlan 1ip address [IP] [mask]no shutdown
Disable ports:interface range fa0/10 - 24shutdown
Conclusion
In this lesson, you learned how to carry out the basic initial configuration of a Cisco switch—the very first steps every network engineer should know. You began by assigning a hostname, which is more than just cosmetic: it helps you identify the device quickly in larger networks and avoids confusion during troubleshooting.
Next, you explored how to secure the switch by setting passwords on privileged EXEC mode and console access. Security at this stage is crucial, since by default Cisco devices have no protection and anyone could gain administrative access.
You then practiced how to save your work using the copy running-config startup-config command. This step ensures that your changes survive a reboot; forgetting this is one of the most common mistakes made by beginners.
To enable remote management, you configured a management IP address on the VLAN 1 interface, allowing you to reach the switch via telnet or SSH from anywhere on the network. This is a foundational step for real-world administration.
Finally, you learned how to disable unused ports with the shutdown command. This is both a security and performance best practice, preventing unauthorized access and reducing the attack surface of your network.
Together, these tasks form the baseline configuration of a Cisco switch. They are not only required in day-to-day IT operations but also represent must-know skills for the CCNA exam. Mastering them means you’re building the right habits from the very beginning of your networking journey.
Summary
What Did You Learn Today?
Let’s Find Out!
Instructions
- Select the correct answer for each technology concept.
- All questions pertain directly to the networking technologies explained.
- After answering, click “See Result” to see your score and feedback.
[Return to CCNA Study Hub] — Next Stop: [Section 2 | Internet Protocol]